HTTP Load Balancing with NGINX
6 minutes read (1450 words)
July 30th, 2023

For the last twelve years, I have been using NGINX to provide load balancing solutions for web applications. In this post I wanted to document ways of setting up HTTP load balancing via NGINX and some common considerations you should make with your web application needs in mind. By the end of this post, you should have a good understanding of how to use NGINX to easily distribute requests across multiple servers for many cases. However, if you are having a hard time figuring out in an evidence backed method the most effective approach for your web application feel free to explore our plans which you can pause at any time between available work.
Load balancing is one of those unsung hero techniques that keeps the internet running smoothly. The goal is simple - take incoming requests and spread them evenly across a group of servers. But the benefits are huge:
- Improve resource utilization by removing idle servers and overworked servers.
- Maximize throughput by allowing more requests to be handled at once.
- Reduce latency by routing each request to the server that can respond the quickest.
- Ensure fault tolerance by quickly shifting traffic away from unhealthy servers.
NGINX is a popular open source web server that also excels as a load balancer. It's blazingly fast, highly customizable, and capable of handling enormous loads with minimal resource usage.
Here we'll cover the core load balancing techniques offered by NGINX. I'll explain each concept in simple terms with easy-to-understand examples. My goal is to provide a friendly introduction to get you load balancing like a pro!
Load Balancing Basics
Before diving into NGINX specifics, let's quickly distinguish between Layer 4 and Layer 7 load balancing. These terms refer to different levels of the OSI networking model:
- Layer 4 load balancers work at the transport layer, looking only at IP addresses and ports. They balance incoming TCP connections across backend servers.
- Layer 7 load balancers work at the application layer, looking at HTTP headers and content. They route complete HTTP requests to backends. Layer 4 load balancing requires less processing overhead, so it can handle more throughput. But Layer 7 provides more flexibility to control how requests are distributed.
NGINX can do both Layer 4 and Layer 7 balancing, but we'll focus on Layer 7 HTTP load balancing in this guide. HTTP is slower but offers advanced traffic control for modern web applications.
Now that we've got the basics down, let's look at configuring HTTP load balancing with NGINX!
HTTP Load Balancing with NGINX
The first step is to create an upstream block describing our group of backend servers:
http {
  upstream myapp {
    server app1.example.com;
    server app2.example.com;
    server app3.example.com;
  }
}
This block is named "myapp" and contains three backend servers. We can reference this group from any NGINX virtual server blocks that need to load balance requests.
NGINX will distribute requests to these servers in round robin fashion by default. Each server gets an equal number of requests sent its way though the load distribution incurred by each request may be uneven across nodes.
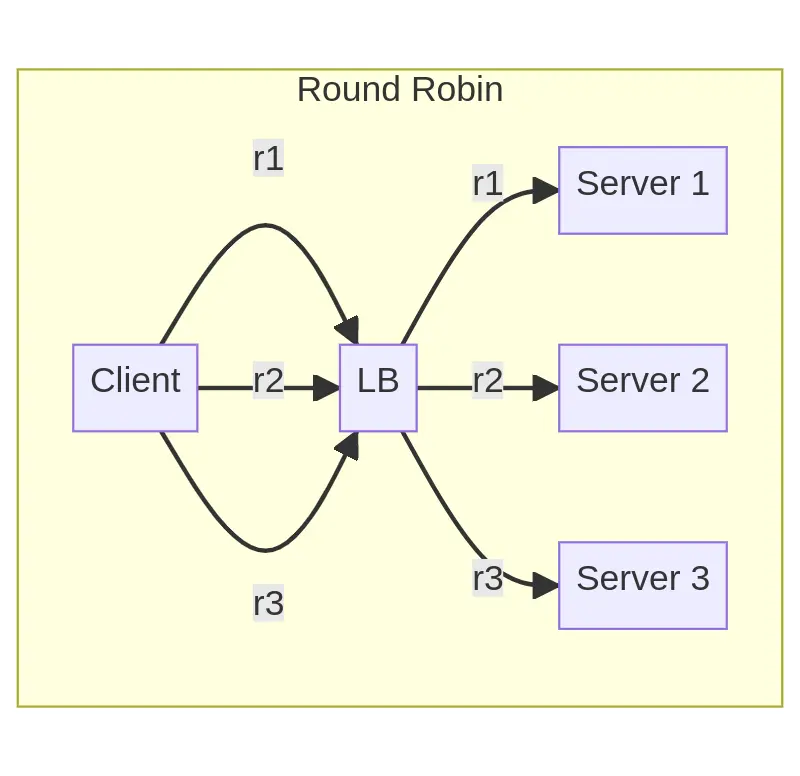
But we can easily change the distribution method to suit our needs. Here are some other algorithms NGINX supports:
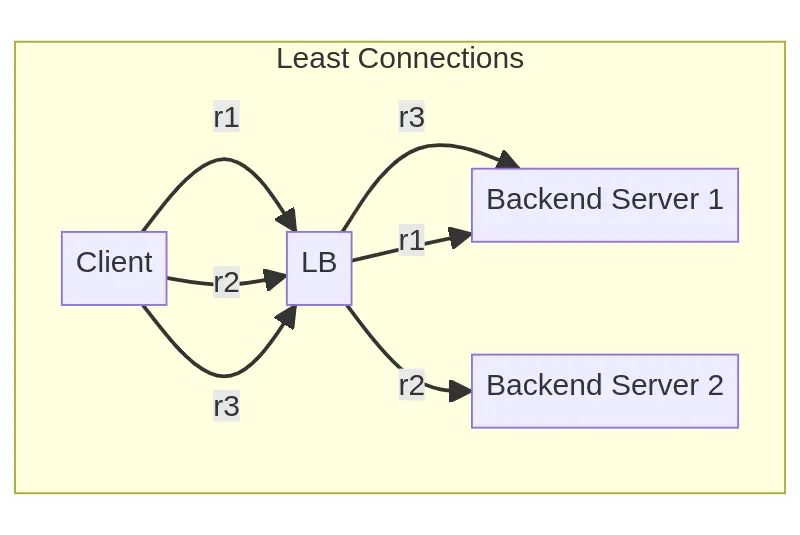
- Least Connections
- Send each request to the backend server with the least number of active connections. Great for balancing uneven loads.
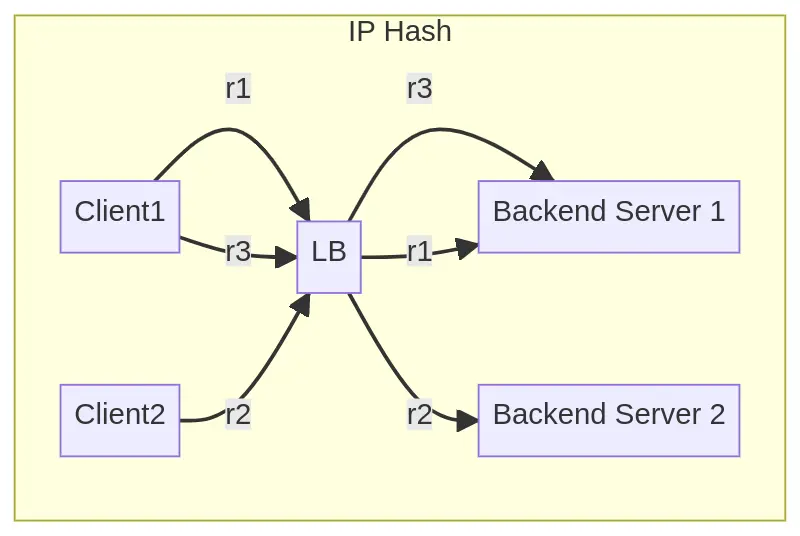
- IP Hash
- Hash the client IP to always pick the same backend server. Useful for session persistence.
- Generic Hash
- Hash a custom key to select the backend server. Allows advanced traffic shaping.

- Random
- Select a random backend server for each request. Improves cache utilization with multiple load balancers.
The possibilities are endless! And we've barely scratched the surface of NGINX's flexible load balancing capabilities.
Now let's look at controlling the proportion of requests allocated to each server. The weight parameter lets us bias distribution towards certain backends:
upstream myapp {
  server app1.example.com weight=3;
  server app2.example.com;
  server app3.example.com;
}
Here app1 will receive 3x as many requests as the other two servers. Weight values are relative, so we can achieve different distributions like 2:1:1 or 1:2:5 easily.
Session persistence is another common requirement, so the client keeps connecting to the same backend during their session. NGINX provides a simple sticky cookie method:
upstream myapp {
  sticky cookie srv_id expires=1h domain=.mydomain.com path=/;

  server app1.example.com;
  server app2.example.com;
}
The first backend server to receive a request from a client will set the "srv_id" cookie, mapping the session to itself. Future requests will read this cookie and return to the original backend. Perfect for shopping carts and user sessions!
Health Checks
Of course, servers sometimes fail. NGINX provides passive health checks to gracefully handle outages.
The max_fails and fail_timeout parameters control when a server is marked down:
upstream myapp {
  server app1.example.com max_fails=2 fail_timeout=30s;
  server app2.example.com;
  server app3.example.com;
}
Here app1 will be considered unhealthy after 2 failures within 30 seconds. NGINX will stop sending it requests until it recovers.
We can also gradually ramp up traffic to a server that was marked down, using the slow_start parameter:
upstream myapp {
  server app1.example.com slow_start=30s;
  server app2.example.com;
  server app3.example.com;
}
Now app1 will take 30 seconds to warm up when recovering before handling full production loads. This prevents it from being overwhelmed.
DNS-Based Load Balancing
Manually keeping the upstream block in sync with backend servers is tedious. Instead, we can use DNS to automatically provide NGINX with the current backend IP addresses.
First, configure DNS resolution:
http {
  resolver 10.0.0.2 valid=300s;

  upstream myapp {
    zone myapp 64k;
    server backend1.example.com resolve;
    server backend2.example.com resolve;
  }
}
The resolver directive points NGINX at our DNS server. Each server entry has the resolve parameter set.
Now when the DNS record for backend1/2 changes, NGINX will automatically apply the updated IP address list for load balancing. No restarts or reconfigs needed!
Health Checks In-Depth
Now that we've covered the fundamentals, let's do a quick deep dive on health checks.
We discussed passive health checks earlier - NGINX silently monitors backend connections and marks down servers when failures exceed the max_fails threshold.
For a more active approach, external tools like Consul or Pingdom can explicitly probe each backend and provide health status back to NGINX. This gives us more visibility and control compared to passive monitoring.
When integrating NGINX with active health checks, the slow_start parameter is invaluable:
upstream myapp {
  server app1.example.com slow_start=30s;
  server app2.example.com;
  server app3.example.com;
}
By gradually ramping up traffic to newly recovered servers, we protect them from being overwhelmed by a flood of connections.
Overall, a combination of passive and active checks provides the best reliability and visibility. NGINX handles passive checks automatically, while external tools give deeper health insight with custom probes.
Best Practices
We've covered a ton of ground already! To wrap up, here are some key tips for load balancing success:
- Monitor key backend metrics - requests/sec, latency, errors. Identify unhealthy servers early.
- Tune health check intervals and thresholds for your app. Aggressive checks can degrade performance.
- Use an auto scaling group with multiple backend AMIs. NGINX can automatically scale up.
- Regularly test failover by disabling backends. Validate the system dynamically adapts.
- Implement DNS-based server changes or an API for backend management. Automate everything!
- There is no one-size-fits-all solution. Experiment with different combinations of methods based on your traffic patterns.
- Continuously inspect metrics and logs for improvements. Load balancing is a recursive optimization problem.
Load Balancing Techniques Comparison
| Method | Key Benefit | Key Drawback |
|---|---|---|
| Round Robin | Simple, equal distribution | Can overload servers with uneven request types |
| Least Connections | Adapts to uneven loads | More state overhead |
| IP Hash | Session persistence | Uneven if sessions differ |
| Cookie Hash | Persistence without state | Extra latency from hashing |
| Health Checks | Fast failure detection | Complex behaviors while flapping or brown outs |
| DNS Load Balancing | Dynamic config | DNS dependency |
Congratulations, you made it! You now understand the core considerations for load balancing with NGINX. The concepts are easy, but the combinations can get complex for large scale web apps.
The great part is NGINX gives you simple building blocks that you can start combining using your own creative problem-solving. Keep iterating and improving based on data, and you will be a load balancing pro in no time!